1 Introduction
The SQL VIEW is a virtual table that does not physically exist. Rather, it is based on the result set of an SQL statement. The advantage of a view is that it can join data from several tables thus creating a new view of it. Instead of sending the complex query to the database all the time, you can save the query as a view and then SELECT * FROM view.
2 Preparation
For the following examples, I set up a new database.
SET LANGUAGE ENGLISH


CREATE DATABASE Views_db;

USE Views_db;
Below I will create 2 example tables that we will continue to work with.
Table 1:
CREATE TABLE Employees
    (ID_empl INT NOT NULL IDENTITY(1,1) PRIMARY KEY,
    First_Name VARCHAR(100) NOT NULL,
    Last_Name VARCHAR(100) NOT NULL)
    ;


INSERT INTO Employees VALUES ('Klara', 'Brown')
INSERT INTO Employees VALUES ('Jessy', 'Williams')
INSERT INTO Employees VALUES ('Emily', 'Taylor')
INSERT INTO Employees VALUES ('Max', 'Steel')
INSERT INTO Employees VALUES ('Alex', 'Smith')
INSERT INTO Employees VALUES ('Marc', 'Pike')
INSERT INTO Employees VALUES ('Tom', 'Hope')
INSERT INTO Employees VALUES ('Sven', 'Evergreen')
INSERT INTO Employees VALUES ('Mike', 'Owen')
INSERT INTO Employees VALUES ('Sarah', 'Pike')


SELECT * FROM Employees;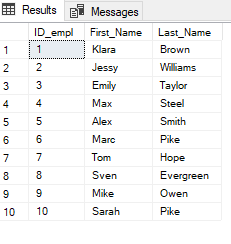
Table 2:
CREATE TABLE Employees_Metadata
    (ID_meta INT NOT NULL IDENTITY(1,1) PRIMARY KEY,
    ID_empl INT NOT NULL FOREIGN KEY REFERENCES Employees(ID_empl),
    Age INT NOT NULL,
    Salary INT NOT NULL,
    Department VARCHAR(100) NOT NULL)
    ;


INSERT INTO Employees_Metadata VALUES (1, 27, 65000, 'Dep_2')
INSERT INTO Employees_Metadata VALUES (2, 40, 55000, 'Dep_3')
INSERT INTO Employees_Metadata VALUES (3, 35, 70555, 'Dep_1')
INSERT INTO Employees_Metadata VALUES (4, 32, 65000, 'Dep_2')
INSERT INTO Employees_Metadata VALUES (5, 40, 90000, 'Dep_2')
INSERT INTO Employees_Metadata VALUES (6, 19, 45000, 'Dep_2')
INSERT INTO Employees_Metadata VALUES (7, 35, 75000, 'Dep_1')
INSERT INTO Employees_Metadata VALUES (8, 55, 110000, 'Dep_1')
INSERT INTO Employees_Metadata VALUES (9, 22, 55000, 'Dep_2')
INSERT INTO Employees_Metadata VALUES (10, 18, 35000, 'Dep_3')


SELECT * FROM Employees_Metadata;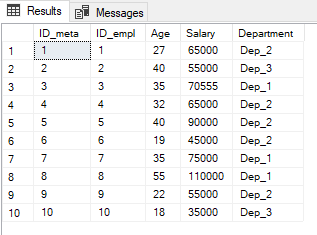
3 Join the tables
SELECT * FROM Employees;
SELECT * FROM Employees_Metadata;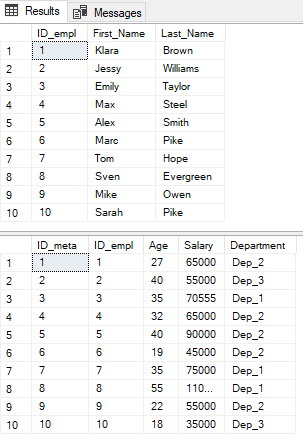
Now we want to join these two tables together to generate insights. How to do that I have described in this post: Left Join
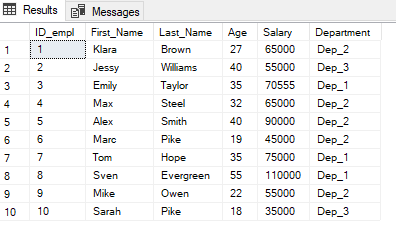
SELECT t1.ID_empl,
       t1.First_Name,
       t1.Last_Name,
       t2.Age,
       t2.Salary,
       t2.Department
    FROM Employees AS t1
    LEFT JOIN Employees_Metadata AS t2
        ON t1.ID_empl = t2.ID_empl
    ;
On this basis, I now have the opportunity to generate valuable insights. But for this I always have to use the join as a subquery.
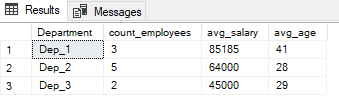
SELECT Department,
       Count(*) AS count_employees,
       AVG(Salary) AS avg_salary,
       AVG(Age) AS avg_age
    FROM (SELECT t1.ID_empl,
                 t1.First_Name,
                 t1.Last_Name,
                 t2.Age,
                 t2.Salary,
                 t2.Department
             FROM Employees AS t1
             LEFT JOIN Employees_Metadata AS t2
                ON t1.ID_empl = t2.ID_empl) AS sub
    GROUP BY Department
    ORDER BY avg_salary DESC
    ;
4 Views
So far, this was just a simple example where we connected two tables quite simply and made queries on them. If the generation of the database becomes more complex, you need a simpler method to make your targeted queries. And this is where views come into play.
4.1 Create VIEW
We can use the output from the join shown earlier to generate a view. This can be used to start further queries quite easily.
CREATE VIEW Employees_Full AS
    SELECT t1.ID_empl,
           t1.First_Name,
           t1.Last_Name,
           t2.Age,
           t2.Salary,
           t2.Department
        FROM Employees AS t1
        LEFT JOIN Employees_Metadata AS t2
            ON t1.ID_empl = t2.ID_empl
    ;
SELECT * FROM Employees_Full;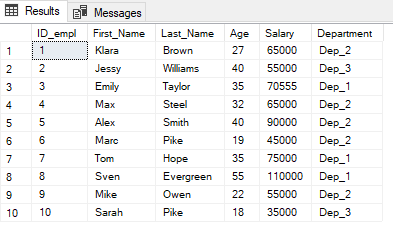
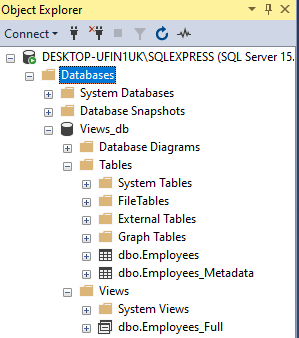
This view is now also stored in the Object Explorer:
Now we execute our further queries on this view.
SELECT Department,
       Count(*) AS count_employees,
       AVG(Salary) AS avg_salary,
       AVG(Age) AS avg_age
    FROM Employees_Full
    GROUP BY Department
    ORDER BY avg_salary DESC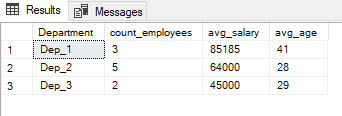
4.2 Update VIEW
Of course, an existing view can be modified without having to delete and recreate it. Here, for example, I exclude department number 3 from the query.
ALTER VIEW Employees_Full AS
    SELECT t1.ID_empl,
           t1.First_Name,
           t1.Last_Name,
           t2.Age,
           t2.Salary,
           t2.Department
        FROM Employees AS t1
        LEFT JOIN Employees_Metadata AS t2
            ON t1.ID_empl = t2.ID_empl
        WHERE Department != 'Dep_3'
    ;
SELECT * FROM Employees_Full;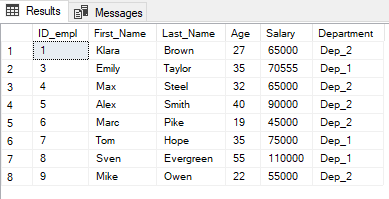
In other SQL languages this can also be called as follows:
REPLACE VIEW Employees_Full AS
    SELECT ...
4.3 Drop a View
Nevertheless, at some point you may want to completely delete a view you once created. This is done as follows:
DROP VIEW Employees_Full;SELECT * FROM Employees_Full;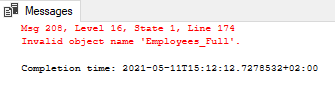
We see the view is no longer available.
4.4 Work with multiple Views
Of course, you can continue to work with created views as you wish.
Below I will create two example views (one with a filter on department 1 and one on department 2) which I will then edit further.
CREATE VIEW View_Dep_1 AS
    SELECT t1.ID_empl,
           t1.First_Name,
           t1.Last_Name,
           t2.Age,
           t2.Salary,
           t2.Department
        FROM Employees AS t1
        LEFT JOIN Employees_Metadata AS t2
            ON t1.ID_empl = t2.ID_empl
        WHERE Department = 'Dep_1' AND Salary < 100000
    ;
CREATE VIEW View_Dep_2 AS
SELECT t1.ID_empl,
t1.First_Name,
t1.Last_Name,
t2.Age,
t2.Salary,
t2.Department
FROM Employees AS t1
LEFT JOIN Employees_Metadata AS t2
ON t1.ID_empl = t2.ID_empl
WHERE Department = 'Dep_2' AND Salary < 60000
;Here are our created views:
SELECT * FROM View_Dep_1;
SELECT * FROM View_Dep_2;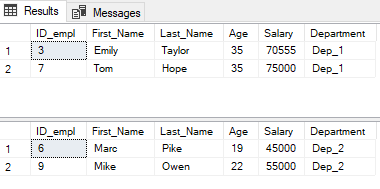
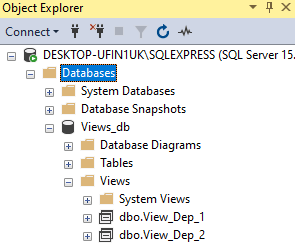
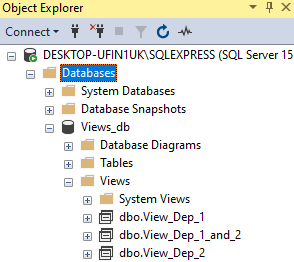
These views can also be found in the Object Explorer:
Now let’s try an UNION.
SELECT First_Name, Last_Name, Salary, Department
    FROM View_Dep_1
UNION
SELECT First_Name, Last_Name, Salary, Department
    FROM View_Dep_2
    ;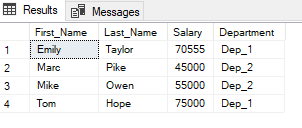
Perfect! Now we save this output again as a view:
CREATE VIEW View_Dep_1_and_2 AS
    SELECT First_Name, Last_Name, Salary, Department
        FROM View_Dep_1
    UNION
    SELECT First_Name, Last_Name, Salary, Department
        FROM View_Dep_2
        ;
This view can also be found again in the Object Explorer:
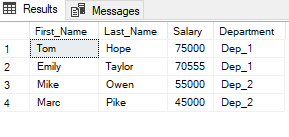
Now we can run queries on it again:
SELECT *
    FROM View_Dep_1_and_2
    ORDER BY Salary DESC
    ;
5 Conclusion
In this post I showed how to create views and the advantages of creating a virtual table like this.