1 Introduction
As already announced in my post Create a 1:m Relationship, we now come to the last general type of relationship between two tables that I would like to deal with here: a n:m relationship
2 The assumed Situation
Let’s assume that this time we are to set up a database for a university with information about the students and the teaching professors.
In our example with the school classes it was easier, because here a teacher was assigned to a certain class (1:m relationship). Since at universities a student can enrol in several courses at will, this type of relationship is somewhat more difficult, and cannot be solved with just two tables (students and professors).
I use the Modified Chen Notation (MC Notation) below.
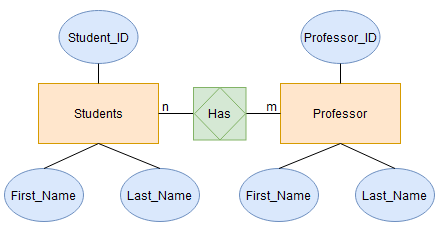
If you can’t read/interpret the diagram accurately, read my post on Associative Entity where I explained this in detail.
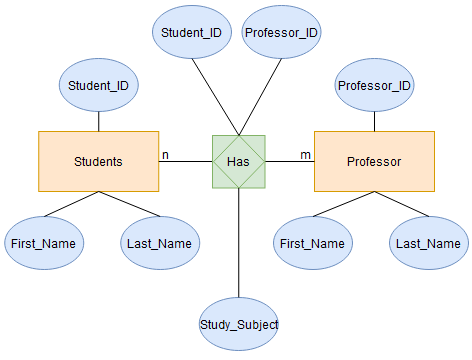
To be even more precise, the diagram would have to look like this:
3 Setting up the database and the required tables
First, we set up the two tables Student and Professor.
Since I would like to have the output of SSMS always in English I use the following syntax.
SET LANGUAGE ENGLISHHow I create the database and the tables can be read in my post Create a Database.
CREATE DATABASE University;

USE University;


CREATE TABLE Student
    (Student_ID INT NOT NULL PRIMARY KEY,
    First_Name VARCHAR(100) NOT NULL,
    Last_Name VARCHAR(100) NOT NULL)
    ;

CREATE TABLE Professor
    (Professor_ID INT NOT NULL PRIMARY KEY,
    First_Name VARCHAR(100) NOT NULL,
    Last_Name VARCHAR(100) NOT NULL)
    ;
4 Connecting the two tables
As the two tables currently stand, we cannot connect them. In order to do this, we need a so-called Associative Table.
The name should be chosen in such a way that it is recognisable for which two entities this table was created. The Foreign Keys are then stored within the Associative Table.
As you can see from the diagram above, our Associative Table has one more attribute. It makes sense not to create a separate table for the ‘Study Subject’, but to store this attribute here in a meaningful way.
4.1 Create an Associative Table
Let’s create our Associative Table:
CREATE TABLE Stundent_Prof
    (StudentProf_ID INT NOT NULL IDENTITY(1,1) PRIMARY KEY,
    Professor_ID INT NOT NULL FOREIGN KEY REFERENCES Professor(Professor_ID),
    Student_ID INT NOT NULL FOREIGN KEY REFERENCES Student(Student_ID),
    Study_Subject VARCHAR(100) NOT NULL)
    ;
Compared to the other tables, I have added another field in this SQL statement which I would like to explain in more detail: IDENTITY
4.1.1 AUTO INCREMENT via SQL Server
Here again is the corresponding part from the previous SQL statement:
CREATE TABLE Stundent_Prof
    (StudentProf_ID INT NOT NULL IDENTITY(1,1) PRIMARY KEY,
    ...)
    ;
IDENTITY is also known as AUTO INCREMENT, which allows us to automatically generate a unique number when a new record is inserted into a table.
Depending on the database system used, the syntax is slightly different.
We use an SQL server here with SSMS.
Therefore, the syntax for AUTO INCREMENT here is IDENTITY.
4.1.2 AUTO INCREMENT via My SQL
As an example, the Syntax for My SQL would be:
CREATE TABLE Stundent_Prof
    (StudentProf_ID INT NOT NULL AUTO_INCREMENT,
    PRIMARY KEY (StudentProf_ID),
    ...)
    ;
4.1.3 AUTO INCREMENT via Access
The Syntax for Access would be:
CREATE TABLE Stundent_Prof
    (StudentProf_ID NOT NULL AUTOINCREMENT PRIMARY KEY,
    ...)
    ;
4.2 Review of the created relationships
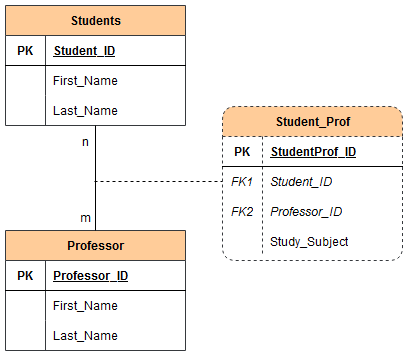
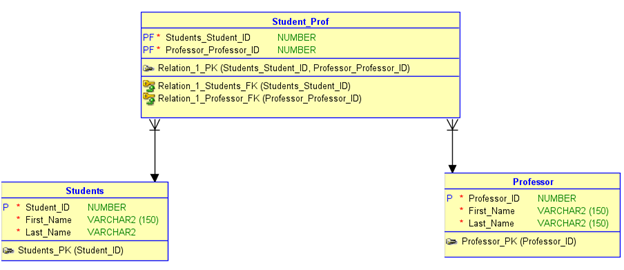
The underlying ERD now looks like this:
Let’s also have a look at the relationship of the tables under Views in SSMS. I have described how to do this here.
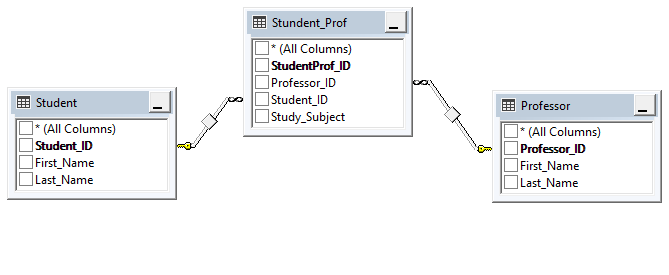
Using the key and infinity symbols we can see how the tables are connected.
If you want to see a representation via Oracle Data Modeler, check out this chapter of my post Oracle SQL Developer Data Modeler: ERDs from old Posts with Oracle Data Modeler
5 Filling the tables
We can do a quick check at this point to see if the tables created really exist.
SELECT * FROM Student
SELECT * FROM Professor
SELECT * FROM Stundent_Prof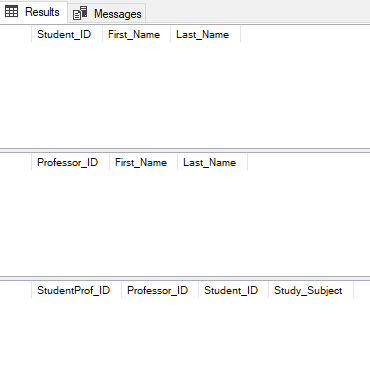
Perfect, then we start filling the tables with sample values.
Again, it is important to pay attention to the order of filling. The two tables Student and Professor can be filled simultaneously.
The foreign keys are stored in the Associative Table Student_Prof. It can only be filled when the corresponding primary keys (‘Student_ID’ and ‘Professor_ID’) are stored, as they are referenced.
INSERT INTO Student (Student_ID, First_Name, Last_Name) VALUES (1, 'Max', 'Steel')
INSERT INTO Student (Student_ID, First_Name, Last_Name) VALUES (2, 'Jessy', 'Williams')
INSERT INTO Student (Student_ID, First_Name, Last_Name) VALUES (3, 'Marc', 'Pike')
INSERT INTO Student (Student_ID, First_Name, Last_Name) VALUES (4, 'Emily', 'Taylor')
INSERT INTO Student (Student_ID, First_Name, Last_Name) VALUES (5, 'Alex', 'Smith')


INSERT INTO Professor (Professor_ID, First_Name, Last_Name) VALUES (1, 'Andrew', 'Evergreen')
INSERT INTO Professor (Professor_ID, First_Name, Last_Name) VALUES (2, 'John', 'Hope')
And now we can also fill the Associative Table:
INSERT INTO Stundent_Prof (Professor_ID, Student_ID, Study_Subject) VALUES (1, 1, 'Law')
INSERT INTO Stundent_Prof (Professor_ID, Student_ID, Study_Subject) VALUES (1, 2, 'Law')
INSERT INTO Stundent_Prof (Professor_ID, Student_ID, Study_Subject) VALUES (1, 3, 'Law')
INSERT INTO Stundent_Prof (Professor_ID, Student_ID, Study_Subject) VALUES (1, 4, 'Law')
INSERT INTO Stundent_Prof (Professor_ID, Student_ID, Study_Subject) VALUES (1, 5, 'Law')

INSERT INTO Stundent_Prof (Professor_ID, Student_ID, Study_Subject) VALUES (2, 1, 'History')
INSERT INTO Stundent_Prof (Professor_ID, Student_ID, Study_Subject) VALUES (2, 2, 'History')
INSERT INTO Stundent_Prof (Professor_ID, Student_ID, Study_Subject) VALUES (2, 3, 'History')
INSERT INTO Stundent_Prof (Professor_ID, Student_ID, Study_Subject) VALUES (2, 4, 'History')
INSERT INTO Stundent_Prof (Professor_ID, Student_ID, Study_Subject) VALUES (2, 5, 'History')
Have a look at the filled tables:
SELECT * FROM Student
SELECT * FROM Professor
SELECT * FROM Stundent_Prof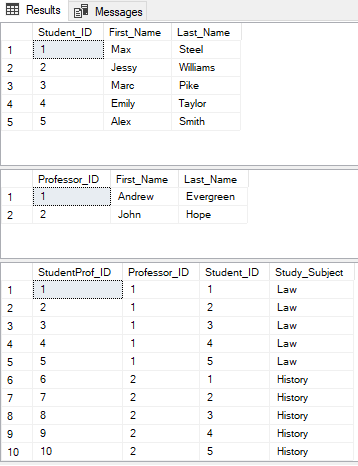
6 Queries on the tables
Now we can start querying the tables.
Here is a simple query as we already know from the two previous posts:
SELECT *
    FROM Stundent_Prof
        JOIN Student
            ON Stundent_Prof.Student_ID = Student.Student_ID
        JOIN Professor
            ON Stundent_Prof.Professor_ID = Professor.Professor_ID;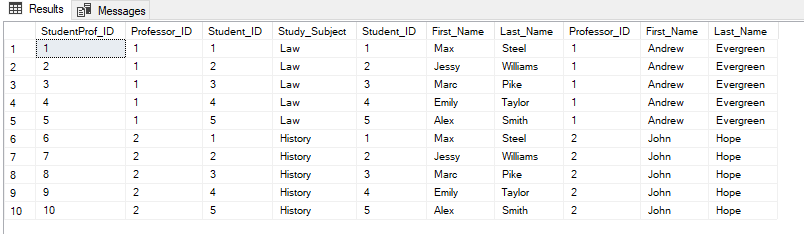
Here is a query in which we filter for the subject ‘Law’:
SELECT *
    FROM Stundent_Prof
        JOIN Student
            ON Stundent_Prof.Student_ID = Student.Student_ID
        JOIN Professor
            ON Stundent_Prof.Professor_ID = Professor.Professor_ID
    WHERE Study_Subject = 'Law';
And here is another query where we want to know which data are all stored for the student with the Student_ID = 1.
SELECT *
    FROM Stundent_Prof
        JOIN Student
            ON Stundent_Prof.Student_ID = Student.Student_ID
        JOIN Professor
            ON Stundent_Prof.Professor_ID = Professor.Professor_ID
    WHERE Student.Student_ID = 1;
Again, I am aware that these joins are not particularly beautiful. I will describe how to execute beautiful joins in a later post.
7 Conclusion
In this post I have shown how to set up an n:m relationship between two tables using an Associative Table and how to query on it.